threeboard user manual
This document explains all of the user functionality of the threeboard. See the examples section at the bottom of this document for usage examples.
Overview
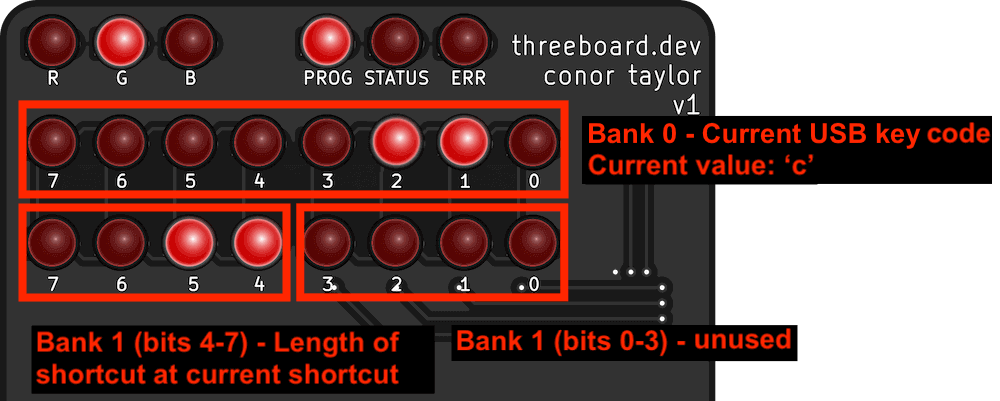
The threeboard uses three keys to select keycodes to send over USB, and also provides three programmable layers to store and retrieve key combinations. The state of the keyboard is visualised using the 22 onboard LED lights, and can only be modified using the three keys. The image below highlights the different features of the device:
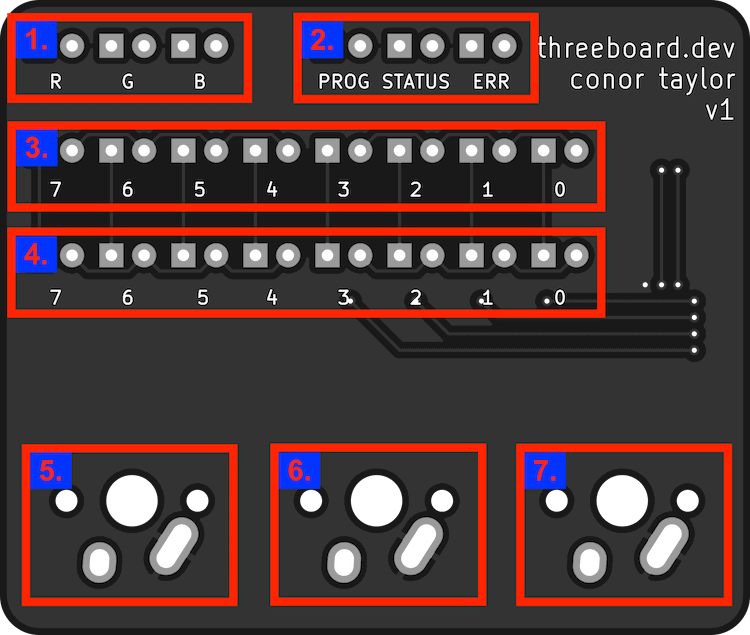
- 3 LEDs indicating the currently selected keyboard layer (R, G and B).
- 3 status LEDs for indicating operating status of the threeboard (PROG, STATUS and ERR)
- Bank0, a binary byte display of 8 LEDs. Used for displaying layer-specific information (e.g. displaying the USB keycode)
- Bank1, another binary byte display with 8 LEDs. Used for displaying a different byte of layer-specific information (e.g. displaying the USB modifier code).
- Mechanical key X.
- Mechanical key Y.
- Mechanical key Z.
Layers and modes
The user-facing functionality is split into layers. A layer changes the functionality of each key on the threeboard, similar to a shift or function key on a traditional keyboard. The threeboard has four different layers: a default DFLT layer, and three programmable layers:
DFLT: The default layer of the threeboard. This is the layer that the threeboard starts in when it boots. No layer LEDs are lit in this layer. This is a single character input layer, where characters and modifiers in this layer are identified by their USB key codes.R: The character reprogramming layer of the threeboard. This layer allows users to reassign a keycode to a character. This allows faster input of common characters.G: The word shortcut layer. This layer allows users to program frequently used words into the threeboard. These words can then be accessed and sent over USB.B: The blob shortcut layer. This allows users to program arbitrary text blobs (including mod codes), and access them later.
The three programmable layers each have two modes: DFLT and PROG:
DFLT: This is the default mode of the programmable layers. It is used to retrieve shortcuts that were programmed in thePROGmode, and send them over USB.PROG: This mode is used for programming the shortcuts used in the DFLT mode of the layer.
Each layer and mode defines its own actions based on the input keypresses. Since there are many possible states, the full mapping of layers, modes, key combinations and actions is quite large, and is defined in the threeboard usage table section below. However most layers share some common actions for some keypresses:
- Key
X: Increment bank 0. - Key
Y: Increment bank 1. - Key
Z: Send keypress(es) over USB (inDFLTmode), or store shortcut inPROGmode. - Key combo
X+Z(a.k.a.XZ): Clear bank 0. - Key combo
YZ: Clear bank 1. - Key combo
XYZ: Go to next layer (when inDFLTmode), or exitPROGmode otherwise. - Key combo
XY: EnterPROGmode (when inDFLTmode).
Brief examples of scenarios in each layer and mode configuration are visualised below:
DFLT layer
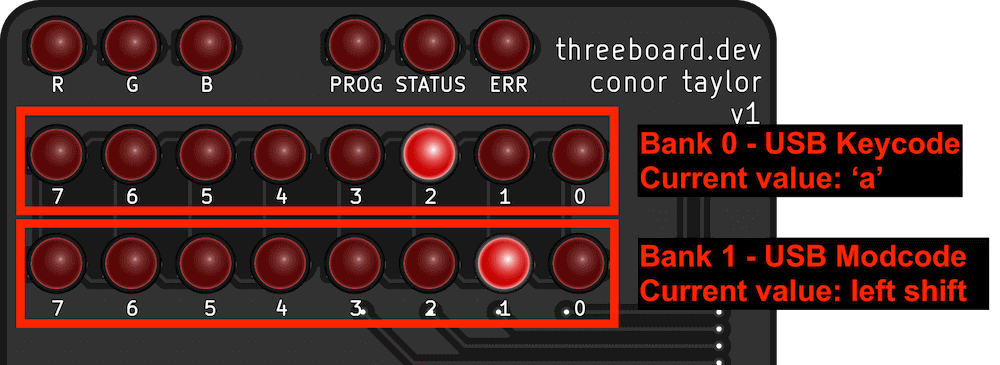
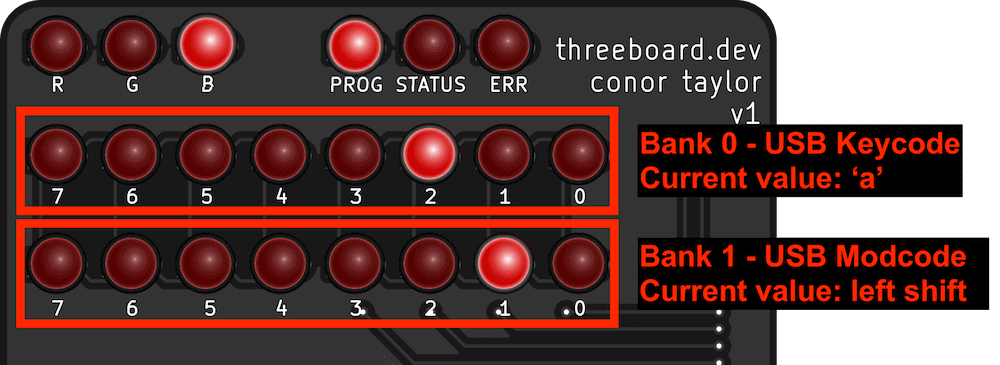
In the DFLT layer, the byte in bank 0 represents the raw USB keycode value to be sent to the host computer, and bank 1 represents the USB modifier code. This layer has no PROG mode.
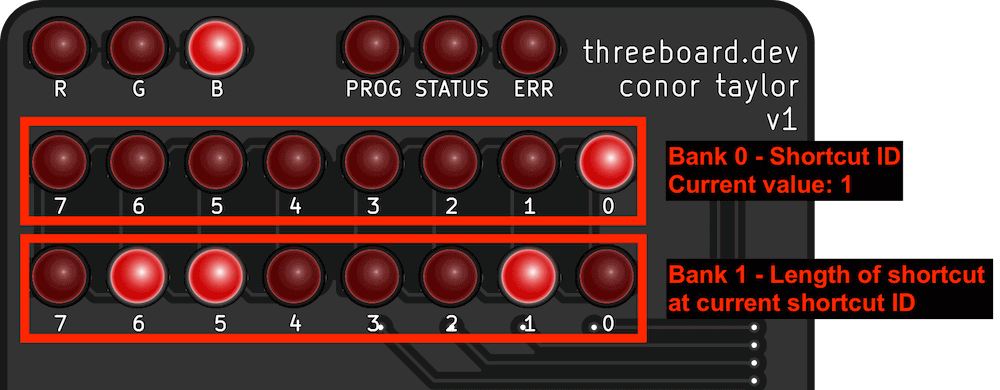
Layer R - The character shortcut layer
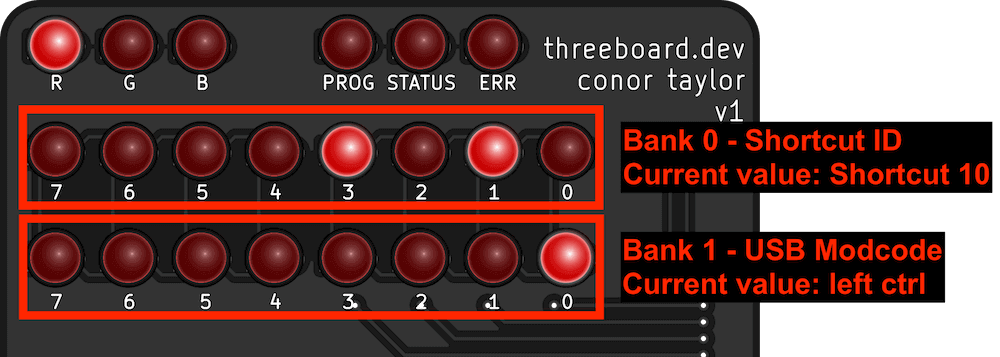
Layer R is used for character reprogramming, which allows re-assigning a value of bank 0 to a different USB keycode than it represents in the DFLT layer. When this layer is being used in DFLT mode, bank 0 is used to identify the shortcut ID, and bank 1 is used as it is in the DFLT layer, to specify the USB modifier code.

In PROG mode, the current shortcut value at the specified shortcut ID is displayed in bank 0. The shortcut ID is instead displayed in bank 0.
Layer G - The word shortcut layer
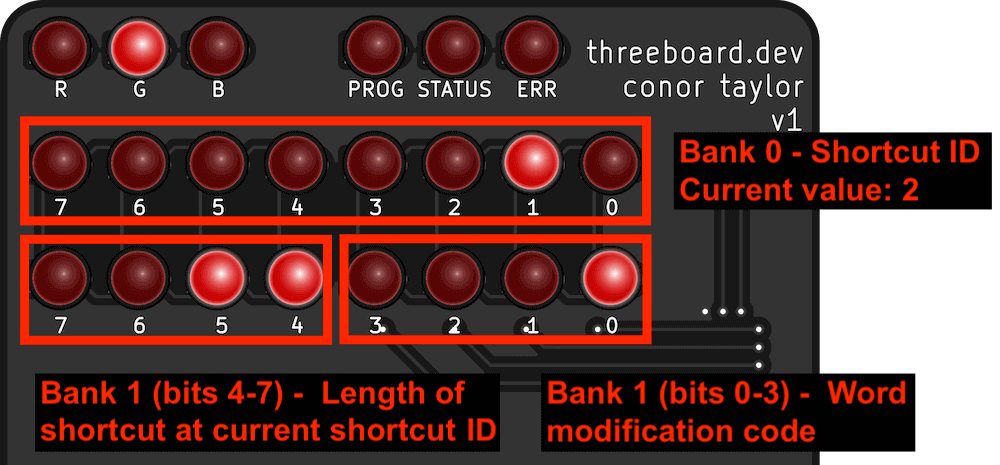
Layer G is used for word shortcut programming. Words up to 15 characters long can be stored per shortcut ID, and modifier codes are used to apply USB modifier codes to the word shortcut (such as capitalizing the first letter). In DFLT mode, bank 1 is split into two 4-bit indicators to display two different values; the 4 high bits are used to display the length of the current shortcut, and the 4 low bits display the word modification code. Word modification codes cause the following modifications:
- Code 0: Word is sent in lowercase.
- Code 1: Word is sent in uppercase.
- Code 2: The first letter of the word is capitalized.
- Code 3: A period (
.) is appended to the end of the word. - Code 4: A comma (
,) is appended to the end of the word. - Code 5: A hyphen (
-) is appended to the end of the word. - Codes 6-15: Reserved. The word is sent in lowercase.
In PROG mode, the current USB keycode to be appended to the word shortcut is displayed in bank 0. The 4 high bits of bank 1 continues to display the length of the word shortcut, but the 4 low bits are unused and always set to 0.
Layer B - The blob shortcut layer
Layer B allows for freeform blob shortcut programming. Blobs of up to 255 keycode and modcode pairs can be stored. In DFLT mode, bank 0 displays the current shortcut ID, and bank 1 displays the length of the shortcut stored there.
In PROG mode, bank 0 displays the USB keycode being programmed, and bank 1 displays the modcode.
Usage table
This table defines the full list of key combinations and their associated actions on each layer:

Examples
This section contains a list of verbose examples to help understand how the key combinations can be used in practice.
DFLT layer
Typing Hello from the DFLT layer:
- Enter the
DFLTlayer. This is the layer the threeboard boots into, identified by none of theR,GorBLEDs being lit. - Select the
hkeycode in Bank 0 by pressing keyX11 times. - Set the
shiftmodcode (to capitaliseh) in Bank 1 by pressing keyYtwice. - Send
Hto the computer over USB by pressingZ. - Reset Bank 0 by pressing
XZ, and reset Bank 1 by pressingYZ. - Select
ein Bank 0 by pressingX8 times, then send it by pressingZ. - Select
lin Bank 0 by pressingXan additional 7 times. - Send
lover USB twice by pressingZtwice. - Select
oby pressingXanother 3 times, and send it by pressingZ.
Layer R
Programming a, b, and c into shortcuts 0, 1 and 2 of layer R:
- Enter layer
Rby pressingXYZfrom theDFLTlayer. TheRLED should now be lit. - Enter
PROGmode by pressingXY, thePROGLED should light up. - Set shortcut 0 to
aby pressingX4 times. - Switch to shortcut 1 by pressing
Y. - Set shortcut 1 to
bby pressingX5 times. - Switch to shortcut 2 by pressing
Y. - Set shortcut 2 to
cby pressingX6 times.
Layer G
Programming hello into shortcut 0 of layer G:
- Enter layer
Gby pressingXYZtwice from theDFLTlayer. TheGLED should be lit now. - Enter
PROGmode by pressingXY. - Select the
hkeycode in Bank 0 by pressing keyX11 times. - Append
hto shortcut 0 by pressingZ. - Clear Bank 0 by pressing
XZ. - Select
ein Bank 0 by pressingX8 times, and append it to shortcut 0 by pressingZ. - Press
Xanother 7 times to selectl, and append it twice to shortcut 0 by pressingZtwice. - Select
oby pressingXan additional 3 times, and append it by pressingZ.
Send Hello over USB from stored hello in shortcut 0:
- Enter layer
G, shortcut 0. - Select the ‘uppercase’ modcode, indicated by a value of 1 in Bank 1, by pressing
Y. - Press
Zto sendHello(with first letter capitalised) over USB.
Layer B
Programming Hi! into shortcut 0 of layer B:
- Enter layer
Bby pressingXYZthree times from theDFLTlayer, lighting theBLED. - Enter
PROGmode by pressingXY. - Append
Hto shortcut 0 by setting Bank 0 toh(pressingX11 times) and Bank 1 to shift (pressingYtwice), and append by pressingZ. - Clear Bank 1 by pressing
YZ. - Select
iin Bank 0 by pressingX, and append it to shortcut 0 by pressingZ. - Select
1in Bank 0 by pressingXanother 18 times. - Set Bank 1 to shift (pressing
Ytwice), and append by pressingZ.